
TM 9-1550-416-14&P
o. A final test is to hold the nose of the plane
g. Turn power panel ON.
up at 45 degrees and then down at 45 degrees.
Indications are as follows:
WARNING
Be sure that no personnel other than
operators are in the immediate area
during operation. The propeller and
the area adjacent to each side of the
propeller is a danger zone when the
engine is running. Keep all personnel
away from the propeller. Ensure that
clothing, glow plug, neck strap, cable,
or starter cable do not become tangled
in the propeller.
h. Close the needle valve clockwise completely
and then open counter clockwise two or three
turns. (This step is only to be performed the first
time the engine is started.)
i. Have two personnel, the controller and assis-
tant, start the engine. The assistant holds the
aircraft in place. The controller holds the nose
with one hand and places the engine starter over
the propeller nut against the propeller and squeez-
es the starter trigger.
j. The engine should start within three sec-
onds. If not, release engine starter, allow 10
seconds for glow plug to reheat, and repeat start-
ing procedures. (If engine fails to start, refer to
starts, but fails to run properly, continue steps as
outlined. If engine appears to run properly, dis-
connect glow plug and proceed to step m.
k. With engine running, disconnect glow plug
clip. If engine stalls, replace glow plug clip. If
engine still stalls when clip is removed, carburetor
is set too rich. Adjust carburetor to proper setting.
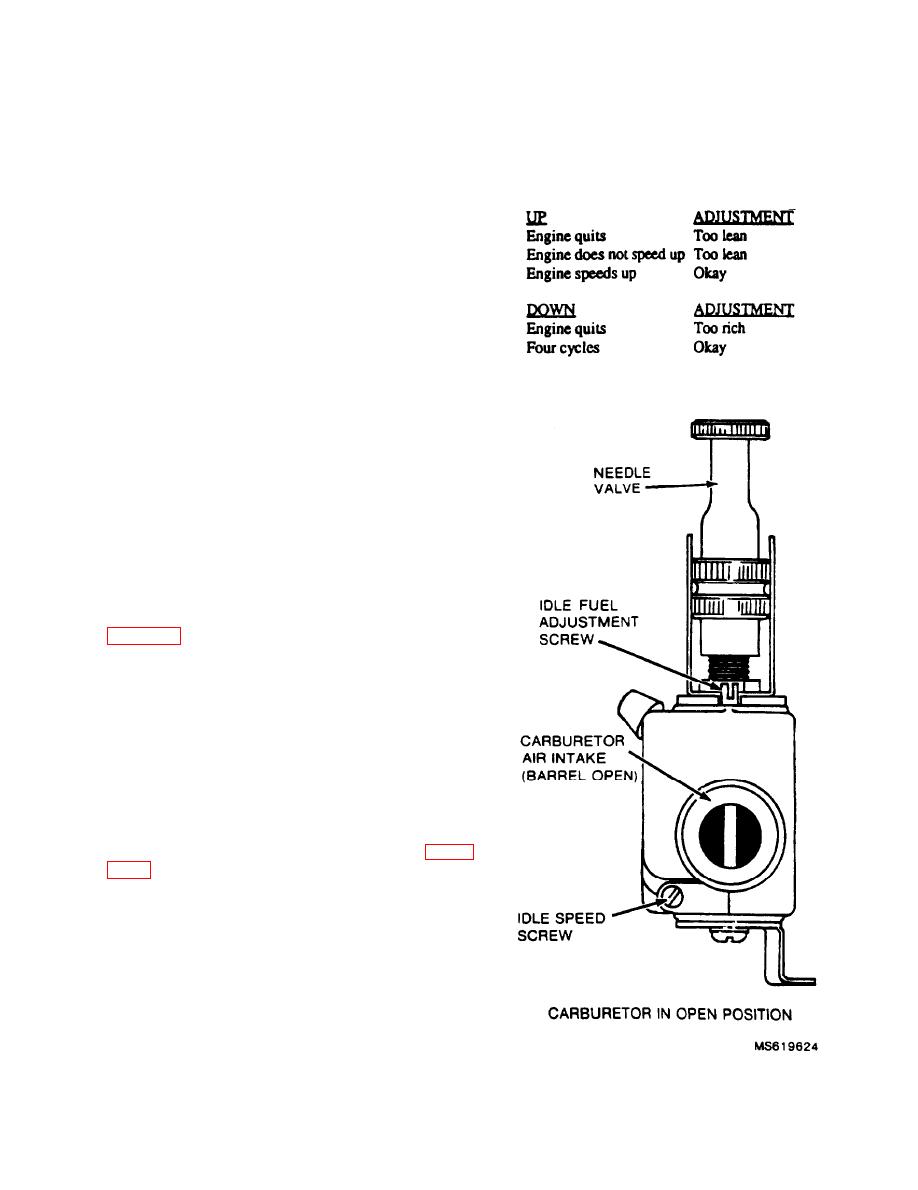
l. Adjust the needle valve for high speed (in-
dicated by transition from 4-cycle burbling sound
to 2-cycle screaming sound). Carburetor barrel
must be fully opened for this adjustment. (For
carburetor adjustment procedures, see figure
to bring engine to idle. Listen carefully for a few
seconds. If engine gradually speeds up and dies,
idle mixture is too lean. Adjust idle mixture a
very small amount. If the engine runs slower and
slower and then quits, idle mixture is too rich.
n. After each idle mixture adjustment, restart
the engine is necessary. Return to full throttle,
then idle, and check the adjustment.
Figure 2-16. Carburetor adjustment points.
Change 1
2-17

