
TM 9-2330-271-14&P
(7) Check for damaged paint and repaint
repair or replacement For inspection purposes, remove
where necessary.
wheels (paragraph 3-18a), hubs and brake drums
e. Assembly (fig. 50).
(1) Install four bolts (35) in spring guide
WARNING
brackets (48).
Weight of semitrailer must be sup-ported
(2) Position spring guide brackets on axle
by leveling jacks or by blocking or
(43).
support stands placed under rear corners
(3) Rotate bolts (35) until they hang freely in
of frame throughout operation.
spring guide bracket without binding against axle.
b. Removal (fig. 6-2).
(4) Position lower torque rod brackets (45)
(1) Position semitrailer on level surface with
under axle and aline holes with bolts protruding from
front end resting on landing gear legs.
spring guide brackets.
(2) Deflate air springs.
(5) Work bolts through mounting holes in
(3) Extend leveling jacks enough to relieve
lower torque rod bracket, taking care not to damage bolt
tires of ground contact and provide support during
threads.
removal and installation operations.
(6) Install lock washer (39) and nut (40) on
(4) Open air reservoir drain cock to relieve air
each bolt; tighten nuts.
pressure.
(7) Position upper torque rod bracket (46) on
(5) Remove wheels (paragraph 3-18a).
top of axle (43).
(6) Remove hubs and drums (paragraph 4-
(8) Install four bolts (35) in upper torque rod
47).
bracket (46) and rotate them until they hang freely
(7) Disconnect hydraulic brake hose at tee on
without binding against axle.
rear center of axle.
(9) Position bracket plate (44) under axle and
aline holes with bolts protruding from upper torque rod
bracket.
(10) Work bolts through mounting holes in
torque rod bracket, taking care not to damage bolt
threads.
(11) Install lock washer (39) and nut (40) on
each bolt; tighten nut.
(12) Install brake assemblies.
(13) Install hydraulic lines at fittings in wheel
cylinders of brake assemblies.
(14) Install hydraulic line connector and band
on axle.
f.
Installation.
(1) Position axle on hydraulic dolly under
semitrailer chassis and aline spring guide brackets (fig.
(2) Connect torque rods (fig. 50) to correct
brackets on axle.
(3) Attach hydraulic hose to tee at center of
axle (paragraph 4-44d).
(4) Install wheels, tires (paragraph 3-18b),
hubs, and brake drums (paragraph 4-47) on axle.
(5) Remove blocking equipment and hoisting
equipment from semitrailer chassis.
Figure 6-2. Removal of axle.
6-3.
Axle, XM844, XM845, XM847,
XM848,
XM849, XM850, XM912, XM913
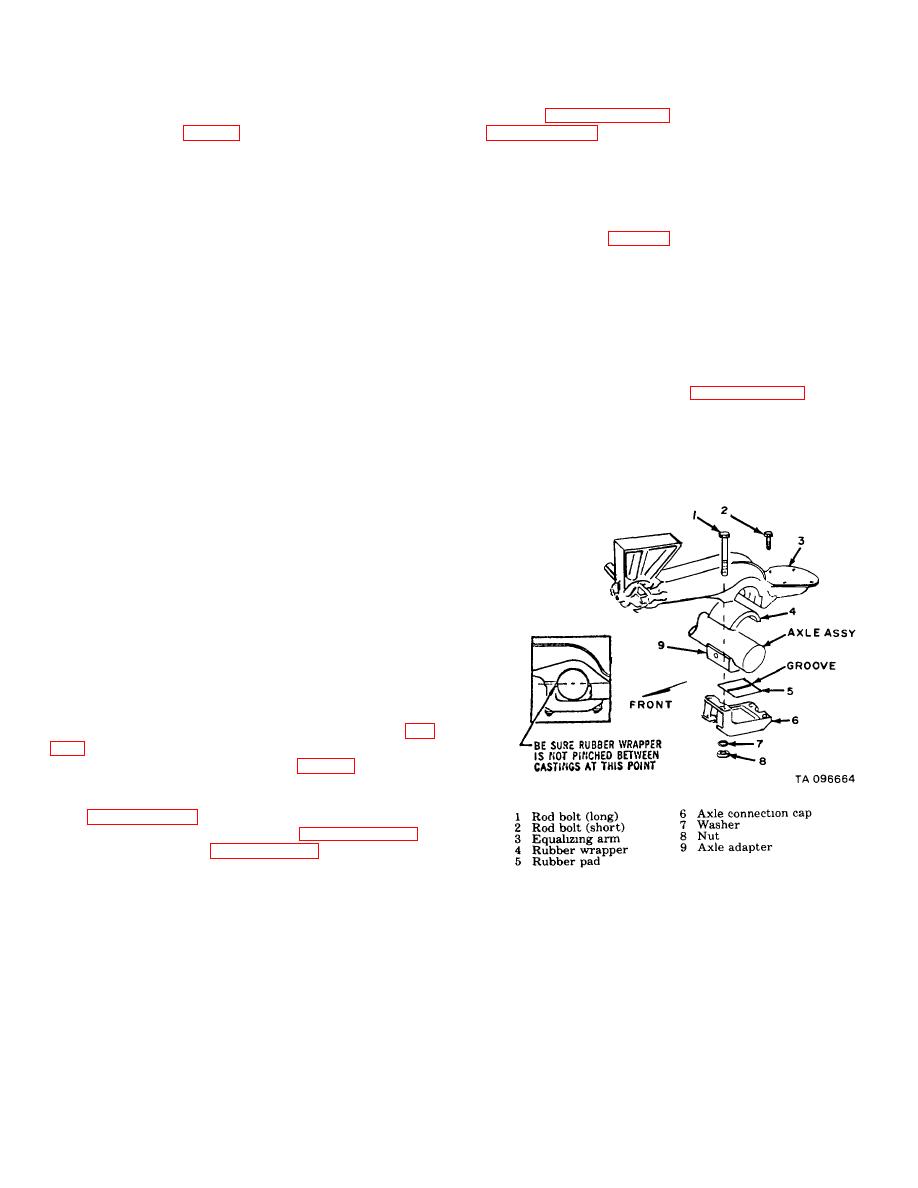
(8) Support axle with jack.
(9) Remove eight nuts (8), washers (7), four
a. General. Generally, axle assemblies will not
rod bolts (1), and four rod bolts (2).
be removed unless inspection discloses a need for
6-4

