
D. STOCK STOP BAR. If a number of pieces are
swing, and loosen the primary drive belt. Move the
to be cut the same length, the stock stop bar may
belt toward the large end of the motor pulley to
be used to preclude measuring each piece. Place the
increase the blade speed, or toward the small end to
work in the machine vise and lower the cutting
decrease the blade speed. Be sure to also move the
head until the blade is just above the work piece.
belt on the counter-shaft pulley, in the same
Position the work piece under the blade for the
direction and the same number of steps, so that the
desired length of cut, and tighten the vise securely.
belt will run straight from the motor pulley to the
Loosen the clamp screw in the stop arm casting
countershaft pulley. If the belt runs angled from
(Fig. 9) so that the casting will slide along the stock
pulley to pulley it will wear unduly and may jump
stop bar. Slide it up against the end of the work
off the pulley. When the belt is adjusted to the
piece and tighten the clamp screw, positioning the
proper step for the desired blade speed, swing the
stop on the upper edge of the work piece.
motor to tension the belt and tighten the cap screw
to securely clamp the motor mount bracket.
This will allow the arm to swing up and away from
the work piece, eliminating jamming of the work
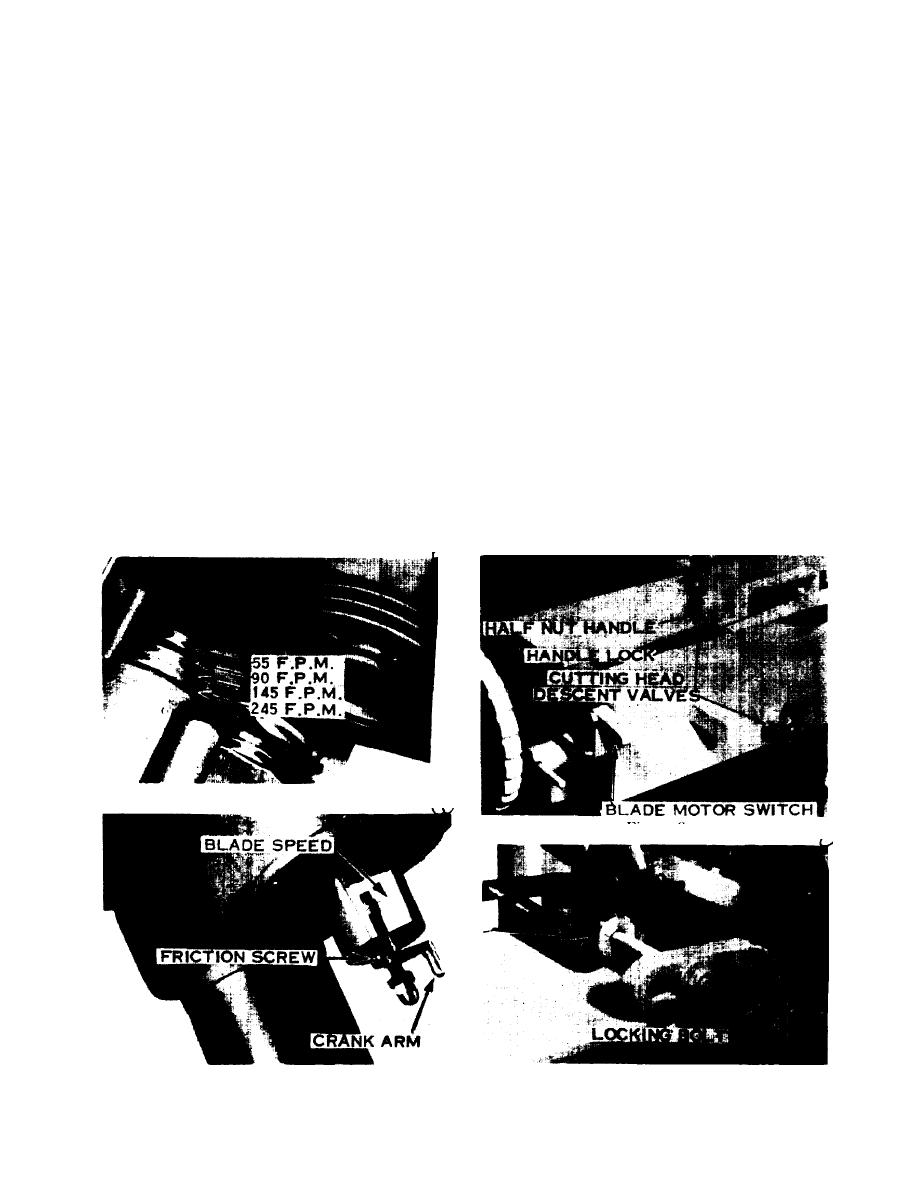
On variable speed machines, start the drive motor,
piece between the blade and the stop arm at the
then turn the crank arm (Fig. 7b) until the indicator
completion of the cut. When setting the stop for
shows the desired blade speed. The crank arm will
short work pieces, be careful not to adjust the stop
be self locking as long as the small friction screw is
arm so that it will swing up into the saw guide.
kept snug.
E. GUIDE ARMS SETTING. Before starting a
cut, adjust the two saw guide arms as close as
possible to the work piece, but be sure to leave
C. VISE OPERATION. To adjust the saw vise to
enough room so that the guides will not hit the vise
the work piece size, place the work piece on the saw
jaws or stock stop bar as the cutting head swings
bed against the stationary vise jaw. Then simply
through the cut. Keeping the guides as close to the
lift the half nut carrier handle (Fig. 8) connected to
work as possible will insure the best cutting results
the movable vise jaw and slide it up against the
and will maintain the blade guard as close as
work piece. Lowering the handle engages the half
possible to the work piece.
nut and vise screw so that final tightening can be
F. CUTTING HEAD DESCENT RATE. To start
done with the handwheel at the end of the vise
a cut, start the blade motor and "crack open" the
screw.
Figure 7
Figure 8
Figure 9
Figure 7-B
22
