
TM9-4110-254-14
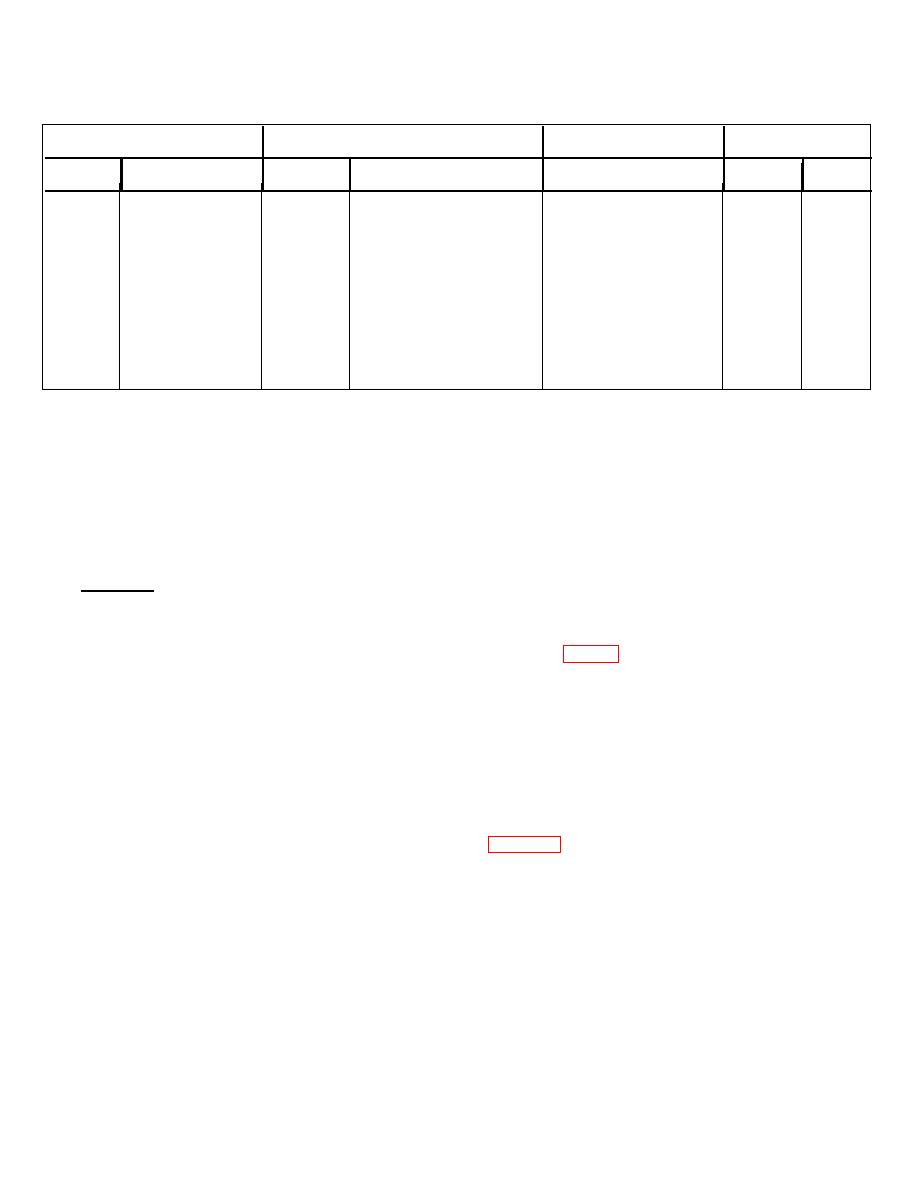
Table 4-3. Wire List-Continued
TERMINATION
TERMINATION
AWG WIRE
LENGTH
SIZE
FROM
TERMINAL TYPE
TO
TERMINAL TYPE
IN.
CM
S6-NO
(D) 82898 (16004)
S7-C
(D) 82898
(16004)
18 AWG-WHT
96.00
243 84
TB2-A
CB1-A1
MS25036-112
12 AWG-WHT
36 00
91 44
TB2-B
CB1-B1
MS25036-112
12 AWG-WHT
36.00
91.44
TB2-C
CB1-C1
MS25036-112
12 AWG-WHT
36.00
91.44
TB2-N
TBl-1
MS25036-112
12 AWG-WHT
36.00
91 44
GND
MS25036-102
TB1-2
MS25036-112
12 AWG-WHT
36.00
91.44
GND
MS25036-102
FR GND
MS25036-157
12 AWG-WHT
24.00
60.96
Control
MS20659-143 (96906)
TB1 (Unit
MS20659-130
(96906)
SEE NOTE 3
4.00
10 06
Panel
GND)
AC Motor MS20659-143 (96906)
FRAME
MS20659-130
(96906)
SEE NOTE 3
16 00
40 64
CompressorMS20659-130 (96906)
FRAME
MS20659-130
(96906)
SEE NOTE 4
9 00
22 86
NOTE
1
Type SO Cable, Conductor Size 12-4, 20 Amps Minimum Rating 250 Vac.
2
Type SO Cable, Conductor Size 14-4, 15 Amps Minimum Rating 250 Vac.
3
Tubular braided wire QQ-B-575/R30T281.
4
Tubular braided wire QQ-B-575/R30T375.
d. Installation.
(1)
Carefully route wire lead(s) through clamp(s) and grommet(s) as necessary.
(2)
Connect wire lead(s) to component using tags and wiring diagram (fig 1-4). Remove tags
(3)
Install tiedown straps as necessary and tighten any clamp(s) that were loosened for removal.
(4)
Apply silicone RTV into evaporator frame grommets (4) to seal evaporator enclosure.
(5)
Close control panel (3). Install two new lock washers (2) and bolts (1).
NOTE
FOLLOW-ON MAINTENANCE:
Install access panel (para 4-15).
Close side doors.
Close enclosure assembly.
Unlatch and close control box cover door.
Connect power and put unit back into service.
4-45
